December 28, 2009

Fried Shrimp

A favorite holiday treat in our family is fried shrimp.  It's one of those dishes that seems festive, but is deceptively simple.  I've been helping my mom make these since I was a kid, and I thought I would photo-document the process for you. 


First, I de-veined, shelled, and cleaned a few lbs of jumbo shrimp.  Make sure to leave the tail on. 


Then I decided to make some fresh bread crumbs.  My parents bring home a lot of day-old bread from their work, and we use this to make bread crumbs.  So I took pieces of bread and food processed it. 


This is what it looks like.  It's still kinda moist and soft, but I like it. 


Okay, so then you make a line-up.  Flour.


Egg (with a little salt).  Er, I didn't take a picture, but these eggs should be beaten.


And bread crumbs. 


So take each shrimp through the line-up.  Lift it by its tail and take it through the steps.  First, give it a nice coat in the flour.  Shake off the loose flour.


Then give it a dip in the egg.  Make sure you coat all of it.


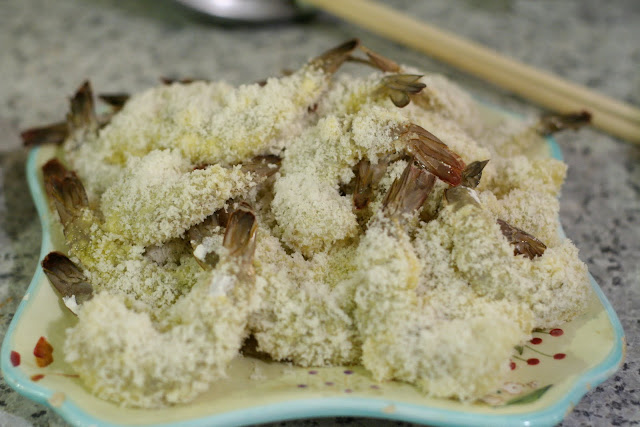
Finally, take it to the bread crumb station and cover it with crumbs.  It helps if you lay the shrimp down and take a small handful of bread crumbs to coat the other side.  Pat it down.  Shake off the excess.


Like this!


Once you have taken all the shrimp through the assembly line...


Heat up a deep skillet with vegetable oil.  When the oil is hot and sizzling (use a trial shrimp), you can add several shrimp into the pan at once to cook.  Watch it bubble and turn a light brown color.


After a minute or two, you can flip it over and cook the other side.  It doesn't take too long for shrimp to cook.  A few minutes is all it takes.


It's important to regulate your oil temperature.  My mom and I don't use thermometers...we just kinda look at the shrimp itself.  If it's getting really brown really quickly, we reduce the heat to medium. 

A perfectly done shrimp looks something like this.


Put it on a paper towel and try to serve it within an hour.  That's when it's best!  Look at this thing of beauty!


If that doesn't make your mouth water, i don't know what will.


You can eat these dipped in ketchup or soy sauce.  But i'm a minimalist...i like eating it plain.


Make these for your New Year's party this year.  I promise it'll be a hit!

This week, I will be traveling the east coast!  If you are on twitter, follow me (username: sunnysideuptalk) and I'll be updating about my yummy travels regularly.  Mostly excited for the real Philly Cheesesteak I'm gonna have when i'm in Philadelphia. 

December 25, 2009

Gingerbread Cookies

I found a fantastic recipe for gingerbread cookies on Simply Recipes, one of my all-time favorite recipe sites.  Elise is my hero because her recipes are very practical, her instructions are super clear, and the food always turns out fantastic even when made by little old me. 


Here's her recipe repeated here, with some pictures of when we were making them. 

Ingredients:

3 1/4 cups sifted all-purpose flour
3/4 teaspoon baking soda
3/4 cup (1 1/2 sticks) unsalted butter (room temperature, softened)
1/2 cup dark-brown sugar, packed
1 Tbsp ground ginger
1 Tbsp ground cinnamon
1/2 teaspoons ground cloves
1/2 teaspoon ground nutmeg
1/4 teaspoon finely ground black pepper
1/2 teaspoon salt
1 large egg
1/2 cup unsulfured molasses

1.  First, mix flour, baking soda, and all the other spices: ginger, cinnamon, cloves, nutmeg, pepper, and salt.  Sift it all together.  I don't have a sifter, so i use a whisk for things like that.


2.  Cream butter in a large bowl.


Add sugar.


3.  Add egg and molasses.  Mmm molasses. 


You can find molasses in the baking aisle of your grocery store.  If it's not there, it also could be found near breakfast syrups.


4.  Add dry mix to the wet mix, but little by little.


Knead it until you get a nice firm lump of dough.


5.  Divide into 3 lumps and cover with plastic wrap.  Refrigerate dough at least an hour. 


6.  Roll out dough on lightly floured surface.  Elise recommends a 1/8" layer, but I like my cookies thick, so i went with 1/4".  T'sup to you.

7.  Cut out your little lads and lasses (fa la la la la, la la la la) and set them on cookie sheets. 


Here's my little helper.


Ready to go into the oven, friends?


8.  Bake at 350F for about 10 minutes (if you made yours a bit thicker like mine).  Maybe 8 if they're thin.


Allow to cool, then decorate with frosting, chocolate chips, candy, or whatever you happen to have on hand. 


Here's a few normal ones.


Then things start getting a little...creative.  Hippie cookie.


A super thin one with an eating disorder.  (He was the last of the batch)


An angry one with a need to pluck.


A Michigan cookie and a tree cookie.


Bad Santa.


A poopy one. (it was supposed to be a pretzel cookie)


A broken one :(  He originally had a smile but got a revised mouth after his leg injuries.


And the scariest one of all: The Zombie Bride. 


Sorry, is that supposed to be me? 

Anyways.

Many thanks to Elise from Simply Recipes for providing this fabulous recipe on her site.  We had a wonderful holiday cookie-making time! 

For a printable version of this recipe, please click here.

December 24, 2009

Christmas is all a-twitter

Merry Christmas, readers!

I suppose Christmas is as good a time as any to admit I've crossed over to the dark side.  I have gotten myself a Twitter account.  Oh NO.  I swore I would never do this, but I blame my brother Jason for showing me how easy it could be to sign up, and how I can use it to follow my favorite singer-songwriters and pretend they're my real friends.  Nice, Jason.  Here's my brother about 14 years ago sitting on Santa's lap.  He looked so innocent and technology-free then.


Anyways, so my twitter username is "sunnysideuptalk".  Add me if you want.  Or not. 

Later today, I'll show you pictures of the gingerbread cookies we made.  They're truly...one of a kind :)

Merry Christmas again!

December 23, 2009

Korean Radish Kimchi (kkak ttu gi)

Very few modern people these days make kimchi from scratch, especially radish kimchi.  Even fewer people make their own kimchi here in the U.S. 


However, you're in luck!  My mom is one of these few people, and I happened to be in the kitchen when she was making it.  Here's the process. 

1.  She first cut up a bunch of Korean radishes (available at asian grocery stores) into 1" cubes.  These have been soaking in salt water for about an hour, then rinsed and drained.

2.  Next, she added a huge amount of minced garlic, like about 1/3 cup.  Hello Korea.


3.  She also added a small amount of ginger (maybe a tbsp or so).

4.  Next, my mom took one bundle of green onions and chopped them into 1 cm pieces.  Then she added these to the mix.


Helloooo.


5.  Then, she pulled this baby out of the fridge.


These are teeny tiny shrimp that have been salt-packed in a sort of brine.  They are used as a condiment to add that seafood flavor to your dishes.  She added about 1/4 cup of it to the mix.


6.  Next comes about a cup of red pepper powder.  Unlike the kind you're familiar with, Korean gochu karu is finer (powder versus flakes).


Yes, a cup of this stuff :)


7.  Finally, Mom topped the whole thing with a generous helping of toasted sesame seeds...


and about 2 tbsp sugar to balance out the taste.  Oh mom :) You're so cool. 


8.  She then put on a plastic glove and hand-mixed the mix.  Mix the mix.


She said that you should do this for a good 5-10 minutes to let the red pepper powder not only get everywhere, but kinda break down and absorb into the radish.


Check that out!  Isn't that pretty?


9.  Then, you add the radish to a large container (glass is preferable).


Put it in the jar and set it out on your counter where it's kinda warm for about 2 days, then put in fridge for 5 days before eating.


This is a great banchan that'll go great with piping hot meat stews, kim bop, or noodles.  It's great for all seasons :)

Now, I know you probably wouldn't make this much of it if you don't have a Korean family to feed, but you can get those mason jars and make a couple to give to Korean-food loving friends.  I know a lot of you are young Koreans out there whose parents would love to you tears if you made this and brought it home for Mom.  :) 

Have a great day!  I hope everyone is having a lovely holiday break with their family and friends!

Other posts you might like:

Blog Widget by LinkWithin